Key Takeaways
- A combination of indigo powder and amla can create a deep, lasting jet black tone on hair when prepared and applied correctly.
- Mixing ratios, application order, and processing time each play a direct role in how dark the final color appears.
- This method works most visibly on hair that is naturally dark brown or black and may produce a softer dark result on lighter hair.
- Rinsing with cool water and avoiding sulfate shampoos after treatment can support color retention.
- Results vary depending on hair texture, porosity, and starting color, so a strand test before full application is always a wise first step.
I spent a long time looking for something that would bring my hair back to that deep, true black it used to be before years of heat and sun pulled it toward a muddy dark brown. Every store option I tried either smelled like a chemical disaster or faded within two weeks. So I started experimenting in my kitchen with things people have quietly been using for centuries, and I landed on a combination that genuinely surprised me with how dark and rich it made my hair look.
This is not a general overview of natural hair color. I want to walk you through one specific method using indigo powder paired with amla, because this particular pairing is what actually creates the jet black tone rather than just a dark blue or a soft gray-black. I will tell you what to use, how much, in what order, and how to apply it without making a mess of your bathroom.
If you have been searching for a genuine jet black result from natural ingredients, this is the combination worth trying.
How Does the Indigo and Amla Method Create a Jet Black Tone?
The reason indigo alone does not create jet black on most hair types is that it deposits a blue-dark pigment that can sometimes lean visibly blue or blue-black, especially in direct light. Amla, which is the dried fruit of the Indian gooseberry, acts as a natural mordant and acidic conditioning agent. When amla water is used as part of the mixing liquid for indigo powder, it helps the pigment bond more deeply to the hair shaft and shifts the tone toward a truer, richer black.
I did not believe this until I saw the difference myself. The first time I mixed indigo with plain water, my hair dried to a very dark blue-black. The second time, when I added amla into the process, the result seemed much closer to the natural jet black I was hoping for. The depth was noticeably different under daylight.
This matters because if you are specifically after jet black rather than dark brown or navy-tinted black, the preparation method makes a real difference.
What Ingredients You Will Need for a Jet Black Natural Hair Dye
For a full application on medium-length hair (shoulder to collarbone), you will need the following quantities. Adjust up or down based on your hair volume and length.
Indigo powder: 100 grams
Amla powder: 2 tablespoons
Warm water: enough to form a thick yogurt-like paste, roughly 150 to 180 millilitres
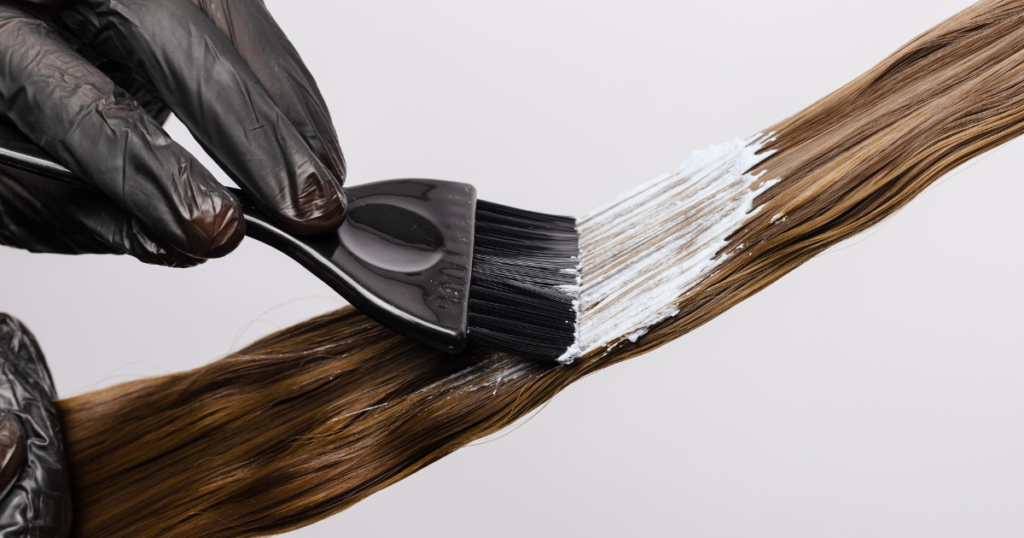
You will also need a non-metal mixing bowl, a non-metal spoon or spatula, gloves (indigo stains skin intensely), a shower cap or plastic wrap, and an old towel or clothing that you do not mind staining.
Do not use a metal bowl or metal tools. Indigo reacts poorly with metal and this can affect the final color result.
How to Prepare the Jet Black Hair Dye Paste Correctly
Step one is to prepare your amla water. Dissolve the two tablespoons of amla powder in about 150 millilitres of warm water. Stir well and let it sit for five to ten minutes. The water will turn a golden-brown color. This is normal.
Step two is to sieve the amla water through a fine cloth or strainer if you want a smoother paste. You can skip this if you do not mind a slightly textured mixture, since the amla particles are fine enough that most people find the paste workable either way.
Step three is to add your 100 grams of indigo powder into the non-metal bowl. Begin adding the amla water gradually while stirring. You are aiming for a consistency similar to thick yogurt or hair conditioner. It should coat a spoon and hold its shape without dripping excessively. If you find the paste too thick, add a small amount of plain warm water. If it becomes too runny, add a little more indigo powder.
Step four is to let the paste rest for ten minutes after mixing. This resting period allows the dye to release its pigment properly. You will often notice the surface of the paste beginning to look slightly darker or developing a faint blue-green iridescence. This is a sign the indigo is activating correctly.
Do not let the paste sit longer than 20 minutes before you start applying, because indigo begins losing potency after this window.
How to Apply the Natural Jet Black Dye for Maximum Coverage
Begin with dry or slightly damp hair. Wet hair tends to dilute the paste and can reduce the depth of color. If your hair is freshly washed, let it air dry until it is just barely damp, not soaking.
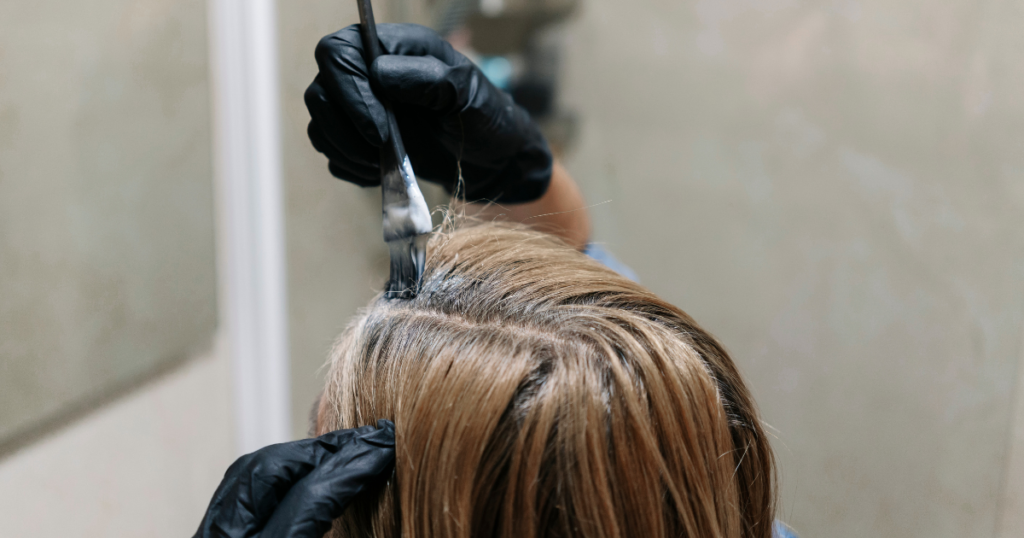
Divide your hair into four sections: two at the front and two at the back. This makes the application much more even and ensures you do not miss patches.
Put your gloves on before touching the paste. I cannot stress this enough. Indigo stains skin and nails a dark blue-black that can take several days to fade.
Using your gloved fingers or a tinting brush, work the paste through each section from root to tip. Make sure every strand is coated generously. Thin or streaky application is the most common reason people do not get full jet black coverage and instead end up with patchy results.
Once all sections are coated, pile the hair on top of your head and cover it with a shower cap or wrap it tightly in plastic wrap. You want to keep the paste warm and moist against the hair.
Leave the paste on for 45 minutes to one hour. For more intense color or on hair that has some lightness or graying, an hour is the better choice. For naturally dark brown or black hair where you are deepening an existing shade, 45 minutes is usually sufficient.
How Long to Leave It On and How to Rinse Correctly
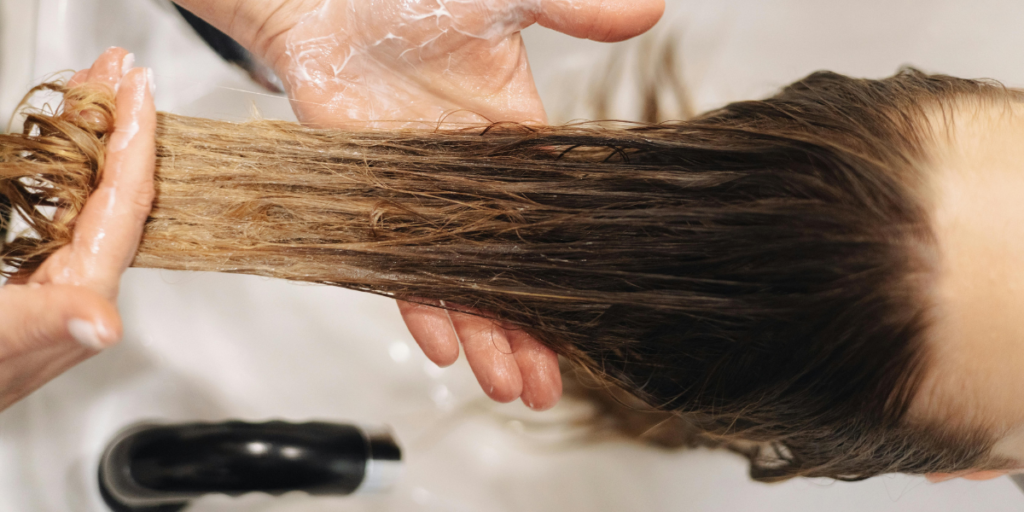
After your processing time is complete, rinse your hair thoroughly with cool water. Do not use shampoo during the first rinse. Simply let cool water run through your hair until it runs mostly clear, which may take several minutes because indigo paste is thick.
Cool water is important here because hot water opens the hair cuticle and can wash out freshly deposited color before it has time to fully set.
After rinsing, you can apply a small amount of a simple conditioner if your hair feels dry, but avoid anything with sulfates or harsh cleansers for at least 48 hours after the treatment.
The color will often appear to deepen and settle further over the first 24 to 48 hours after application, especially with indigo. What looks like a very dark blue-black when wet may dry down to a richer and truer black by the next morning. This is normal oxidation and is actually a sign that the dye has worked well.
How Often Can You Repeat This Method
Most people find that repeating this treatment every three to four weeks maintains a consistent jet black tone without overly drying the hair. Because indigo and amla are conditioning in nature rather than stripping, the hair tends to remain relatively soft and manageable with regular use.
If you notice the color fading toward a dark brown or greenish tone at the ends over time, a shorter application of 30 to 45 minutes on the lengths only (skipping the roots) may be enough to refresh the color between full treatments.
A Note on Strand Testing Before Full Application
Before doing your first full application, take a small section of hair from an inconspicuous area and apply the paste to just that piece. Wait the full hour, rinse, and allow it to dry fully.
This tells you two things: first, whether the color result is what you are looking for on your specific hair, and second, whether your scalp or skin reacts to any of the ingredients. Amla and indigo are generally considered gentle, but individual sensitivities vary, and doing a small test costs you nothing except a few minutes.
Final Takeaway
What I appreciate most about this approach is that it asks very little of you once you understand the preparation. It is quiet, it is straightforward, and when the processing time is done and you rinse your hair for the first time, there is something genuinely satisfying about seeing that deep, natural-looking black come through without any of the harshness of a box dye.
It may not work identically for every person, and the first attempt is always a little uncertain. But the combination of indigo powder, amla water, the right mixing ratio, and the patience to leave it on for a full hour is what made the difference for me. If you have been circling this idea for a while, it is worth giving it a proper try.
Try This Today
If you have indigo powder at home, mix a small test batch using just one tablespoon of powder and a teaspoon of amla dissolved in warm water, apply it to a hidden strand, and see what your hair does with it. That single strand will tell you more than any research ever could about whether this is the right fit for your hair.
Frequently Asked Questions About Natural Homemade Jet Black Hair Dye
Will this method work on hair that is naturally light brown or blonde?
Indigo applied directly to light hair without any prior preparation may produce a dark greenish or blue-black tone rather than a true jet black. On lighter hair, some people choose to first apply henna to create a darker base, and then apply indigo over it. However, the method described in this article focuses specifically on dark-based hair. If your starting color is significantly lighter, results may vary considerably.
Does indigo powder expire or lose potency?
Yes, indigo powder can lose its dyeing potency over time, especially if stored in humid conditions or exposed to air. Always store it in a sealed, airtight container away from moisture and direct sunlight. Powder that has developed a brownish or yellowish tinge may have degraded and will likely not produce a strong black tone.
Can this method be used on chemically treated or relaxed hair?
It can, but chemically processed hair tends to be more porous, which means it may absorb the dye unevenly. Some sections may appear darker than others. A strand test is especially important here before doing a full application.
How different is this from using henna for dark hair?
Henna alone produces a reddish-orange tone, which is why it is not used for black hair on its own. Indigo is what creates the blue-to-black pigment. The combination of indigo with amla water, as described here, is focused specifically on achieving the darkest black possible without a red undertone from henna.
Is this method safe to use on the scalp?
For most people, yes. However, anyone with a sensitive scalp or known sensitivity to plant-based products should do a patch test on the inner wrist or behind the ear 24 hours before applying to the scalp. If any redness, itching, or irritation occurs during the patch test, do not proceed with a full scalp application.

- How to Dye Your Hair Purple at Home (and Actually Keep the Color) - June 22, 2026
- Cool Hair Dye Ideas for Short Hair That Actually Look Stunning - June 11, 2026
- Cool Hair Dye Ideas That Actually Suit Real Life and Real Hair - June 9, 2026